How to Make Berry Icebox Cake in Minutes

If you’re craving a dessert that is effortlessly elegant, refreshingly fruity, and comes together in no time, this Berry Icebox Cake is exactly what you need. Whip up a delicious Berry Icebox Cake in minutes with this easy, no-bake recipe bursting with fresh berries and creamy layers, perfect for any occasion. The combination of crisp wafers, luscious whipped cream, and vibrant berries makes for a delightful treat everyone will adore.
Why You’ll Love This Recipe
- Quick and Easy Preparation: No oven required, so you can have dessert ready in just minutes.
- Fresh and Fruity: Loaded with colorful seasonal berries that bring natural sweetness and vibrant flavor.
- Creamy Texture: Silky whipped cream layers perfectly balance the crisp cake wafers for an irresistible bite.
- Make-Ahead Friendly: It tastes even better after chilling, giving you flexibility for busy days.
- Impressive Yet Simple: Looks stunning on any table without demanding hours of prep or fancy techniques.
Ingredients You’ll Need
The beauty of this Berry Icebox Cake lies in its simple yet essential ingredients, each one contributing to a delicious medley of fresh flavors, creamy texture, and a light, airy finish. Here’s everything you need to bring this delightful dessert to life.
- Fresh Berries: Strawberries, blueberries, raspberries, and blackberries provide natural sweetness and a pop of color.
- Whipped Cream: Use heavy cream whipped with a touch of sugar and vanilla for the perfect rich and airy filling.
- Vanilla Wafers or Graham Crackers: These create the crisp and slightly sweet layers that soak up the cream perfectly.
- Powdered Sugar: Adds a gentle sweetness to the whipped cream without overpowering the berries.
- Vanilla Extract: Enhances the cream’s flavor with a cozy, aromatic touch.
Variations for Berry Icebox Cake
One of the best things about this recipe is how easily you can tailor it to your preferences or dietary needs. Whether you want to mix up flavors, swap ingredients, or add a personal touch, this cake is happily customizable.
- Citrus Twist: Add thin slices of orange or lemon zest for a bright, zesty flavor that complements the berries.
- Dairy-Free Version: Substitute whipped coconut cream for a creamy, allergen-friendly alternative.
- Chocolate Lover’s Option: Layer in some chocolate shavings or use chocolate graham crackers for a richer taste.
- Nutty Crunch: Sprinkle toasted almonds or pistachios between layers to add a surprising crunch.
- Mixed Fruit Medley: Swap some berries for peaches, kiwis, or mango slices for a tropical flair.

How to Make Berry Icebox Cake
Step 1: Prepare the Whipped Cream
Begin by chilling your mixing bowl and beaters for about 15 minutes for better whipping results. Then, whip the heavy cream with powdered sugar and vanilla extract until soft peaks form—airy and fluffy but still sturdy enough to layer.
Step 2: Layer the Ingredients
In a glass dish or trifle bowl, start by spreading a thin layer of whipped cream on the bottom. Arrange a layer of vanilla wafers or graham crackers over the cream in a single layer, slightly overlapping as needed.
Step 3: Add Berries and Cream
Top the wafers with a generous helping of mixed fresh berries, then spread another layer of whipped cream over the berries, smoothing gently to cover. Repeat these layers until you run out of ingredients or fill your dish.
Step 4: Final Chill
Cover the assembled cake tightly with plastic wrap and refrigerate for at least 4 hours, preferably overnight. This chilling step allows the wafers to soften slightly and flavors to meld beautifully.
Step 5: Serve and Enjoy
Before serving, garnish with extra fresh berries or a light dusting of powdered sugar for a visually stunning finish that tastes as good as it looks.
Pro Tips for Making Berry Icebox Cake
- Use Fresh, Ripe Berries: The fresher the berries, the more vibrant and flavorful your cake will be.
- Don’t Skip Chilling: Allow enough refrigeration time to let the layers soften and meld perfectly.
- Layer Carefully: Spread the whipped cream evenly to avoid breaking the wafer layers when you slice.
- Adjust Sweetness: Taste your whipped cream before layering and add sugar gradually to avoid oversweetening.
- Serve Cold: This cake is best enjoyed chilled straight from the fridge for the perfect texture and taste.
How to Serve Berry Icebox Cake
Garnishes
Garnish with extra fresh berries, a sprig of mint, or a drizzle of honey to add color and flair that’s as delightful to the eyes as to the palate.
Side Dishes
This dessert pairs wonderfully with light accompaniments like a glass of chilled rosé, a cup of herbal tea, or even a small scoop of lemon sorbet to enhance its refreshing qualities.
Creative Ways to Present
Serve in individual clear glass jars or trifle bowls to show off the beautiful layers, or create mini parfaits for easy portion control and a charming presentation at parties.
Make Ahead and Storage
Storing Leftovers
Store any leftovers tightly covered in the refrigerator for up to 3 days to keep the whipped cream fresh and the wafers tender yet not soggy.
Freezing
This cake doesn’t freeze well because the texture of the whipped cream and berries can change upon thawing, so it’s best enjoyed fresh, within a couple of days.
Reheating
No reheating needed—this is a cold dessert designed to be served straight from the fridge, preserving its creamy, refreshing character.
FAQs
Can I use frozen berries instead of fresh ones?
While fresh berries provide the best texture and flavor, you can use frozen berries if necessary—just thaw and drain them thoroughly to avoid adding extra moisture that could soften the wafers too much.
Is there a gluten-free option for this recipe?
Absolutely! Simply swap vanilla wafers or graham crackers with gluten-free alternatives to keep the dessert safe for gluten-sensitive eaters.
How long can I prepare Berry Icebox Cake in advance?
You can assemble the cake the day before and refrigerate overnight; this actually improves the flavor, but try not to keep it longer than 24 hours for optimal freshness.
Can I make the whipped cream ahead of time?
Whipped cream is best made fresh, but you can whip it a few hours in advance and store it covered in the refrigerator—just give it a quick whisk before layering if it looks like it has separated slightly.
What can I substitute for vanilla wafers?
If you don’t have vanilla wafers, graham crackers, ladyfingers, or even thin butter cookies can work beautifully as an alternative crunchy layer.
Final Thoughts
Making this Berry Icebox Cake is like inviting a burst of summer sweetness to your table with zero fuss. Whether you’re whipping it up for a last-minute gathering or indulging yourself on a sunny afternoon, it’s a dessert that brings joy with every bite. Give this recipe a try and enjoy the perfect harmony of fresh berries, creamy layers, and crispy wafers all in one dreamy, no-bake treat.
Related Posts
- Irresistible Pumpkin Cupcakes with Cream Cheese Frosting
- Why Heavenly Raspberry Cheesecake Cupcakes Delight
- How to Make Reese’s Peanut Butter Banana Bread
Berry Icebox Cake
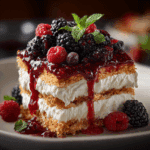
A no-bake, quick and easy Berry Icebox Cake featuring layers of crisp vanilla wafers or graham crackers, luscious whipped cream, and a vibrant medley of fresh berries. This elegant and refreshing dessert is perfect for any occasion and improves in flavor after chilling.
- Prep Time: 15 minutes
- Cook Time: 0 minutes
- Total Time: 4 hours 15 minutes
- Yield: 8 servings 1x
- Category: Dessert
- Method: No-Bake
- Cuisine: American
- Diet: Gluten Free (if using gluten-free wafers or crackers)
Ingredients
Fresh Berries
- Strawberries, blueberries, raspberries, and blackberries – amount as desired for layering and garnish
Whipped Cream
- 2 cups heavy cream
- 2–3 tablespoons powdered sugar (adjust to taste)
- 1 teaspoon vanilla extract
Layers
- Vanilla wafers or graham crackers – about 2-3 cups or enough to create multiple layers
Instructions
- Prepare the Whipped Cream: Chill your mixing bowl and beaters for 15 minutes. Whip the heavy cream with powdered sugar and vanilla extract until soft peaks form—airy and fluffy but still sturdy enough to layer.
- Layer the Ingredients: In a glass dish or trifle bowl, spread a thin layer of whipped cream on the bottom. Arrange a single overlapping layer of vanilla wafers or graham crackers over the cream.
- Add Berries and Cream: Spread a generous layer of mixed fresh berries over the wafers, then top with another layer of whipped cream, smoothing gently. Repeat these layers until ingredients are used or dish is filled.
- Final Chill: Cover the assembled cake tightly with plastic wrap and refrigerate for at least 4 hours, preferably overnight, allowing wafers to soften and flavors to meld.
- Serve and Enjoy: Before serving, garnish with extra fresh berries or a light dusting of powdered sugar for a beautiful presentation.
Notes
- Use fresh, ripe berries for the best flavor and texture.
- Do not skip refrigeration to allow layers to soften and flavors to meld.
- Spread whipped cream evenly to avoid breaking wafers when slicing.
- Taste whipped cream before layering and adjust sugar gradually to avoid oversweetening.
- Serve chilled straight from the refrigerator for optimal texture and taste.
Nutrition
- Serving Size: 1 slice
- Calories: 250
- Sugar: 18g
- Sodium: 150mg
- Fat: 16g
- Saturated Fat: 10g
- Unsaturated Fat: 4g
- Trans Fat: 0g
- Carbohydrates: 20g
- Fiber: 3g
- Protein: 3g
- Cholesterol: 60mg
Keywords: berry icebox cake, no bake dessert, whipped cream dessert, fresh berry cake, summer dessert, quick dessert